Showing posts with label do it yourself. Show all posts

Wednesday, 12 August 2015

ROOT TOUCH UP AT HOME | UNDER £5.00


As my hair is naturally blonde I have to darken my roots quite often so this needs to be quick, effortless and cheap. I use the Clairol Root Touch Up in the shade Dark Brown. It comes with gloves, a root brush, a small container and two solutions that you mix together, it is very self explanatory. It is the perfect amount of product for thick hair like mine as it's goes a long way, and at £4.69 it is a brilliant price considering a salon would probably charge 5 × that amount.


I do like to wear an old T-shirt, lay an old towel on the floor as my carpet is cream and keep some face wipes close by. You can apply Vaseline around the hairline before you apply the dye and that will protect the skin. 


Once I have prepped my space I only use two things, a comb and a clip which most girls have anyway. This is to split the hair into sections and clip the rest of the hair up whilst you focus on applying the dye to the chosen section.


You can only see my roots slightly due to the lighting but my hair is naturally brighter in person. I can get away with my roots for sometime as the colour blends into my parting but this only works for so long.


When dying your roots you need to ensure you are not going past the line where your root ends otherwise it's going to dye the other hair darker and this will start to look a bit strange.

ROOT DYE ROUTINE

1. Apply the hair dye to the parting 
2. Use the pointy side of the comb to pull up a thin section of hair, approximately a fingers width
3. Carry on this routine throughout the hair 

You may need some help the first few times at the back of the head but I have learnt to use my fingers on my left hand as a reference point and apply the dye with my right hand. This will get easier the more you do this.


Wash and blow dry your hair, you can see in the photo above that my roots look a lot darker and it all blends in with the rest of my hair.


I hope you like this short budget root touch up tutorial on how to dye your roots at home.

Katy xoxo 

Wednesday, 4 March 2015

DIY Two Piece Matching Set


The hype over matching two pieces inspired me to try and make one myself. This matching set was made from a dress I bought from Primark for £2. The dress was a size 14, two dress sizes bigger than my size. The print on the fabric is so vibrant and it would be great for the summer. It is a unique piece and you wouldn't have to worry about someone else wearing the same outfit.
 
 
I bought this dress specifically to do this DIY as it was only £2 so if anything went wrong I wouldn't loose anything. I tend to do this a lot. This was quite an easy task and anyone could do this as there is no sewing machine involved. If you have a sewing machine then great, but if not that isn't a problem.
 
I wanted to completely change the dress but some steps are not necessary. If you want something sweet and simple then this DIY is perfect for you. The great thing about matching two pieces is that they are multi purpose pieces, you can style the skirt and top together or with different outfits.
 
Please watch the video tutorial below for a step by step guide to how I made this two piece.
 
 
The materials you will need:
 
Dress
Pins
Scissors
Needle Picker (Optional)
Clothing Hem
Iron
Black Material
Card
Foam Material
White and Black Thread
Needle
Three Press Studs (Optional)
Hook and Eye (Optional)
 
To make this DIY easier I would definitely consider not cutting out the back of the crop top and only using material for your belt as it will be easily washable.
 
I hope you like this DIY and make sure you rate and subscribe to my channel for more videos!
 
Katy
xxx


Wednesday, 18 February 2015

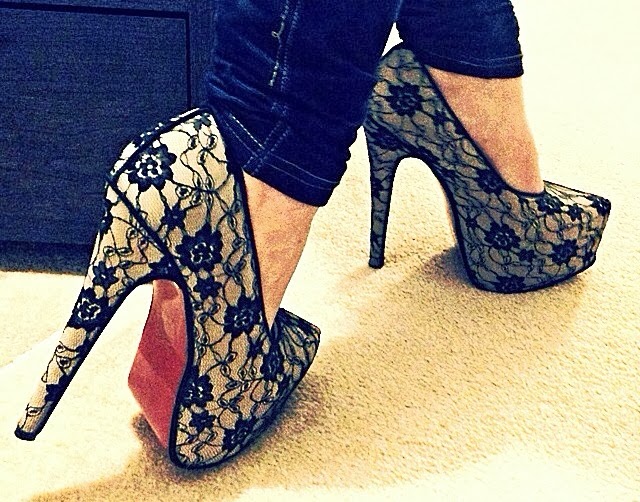
DIY Lace Heels


If your anything like me then you love shoes, my wardrobe is in the process of being transformed in order to fit more in! I can honestly admit I have a bit of an obsession! I can't really remember the first time I tried a pair of high heels but I bet it was funny. Strutting around in your mums heels! My other obsession is definitely being a crafty person, I like to transform anything I can into something that's my own, whether I'm creating something from scratch, transforming an item or adding a crafty touch.
 
My first YouTube video is a DIY video of transforming these nice classic heels. I bought these from eBay for a cheap £6. I have only worn them once as there slightly too big for me! They have just been sat in my closet for months so I took it upon my self to come up with ideas that would make them look unique but in season. I didn't want to replicate something I had seen, I just wanted to create something that would transform them and increase there value and appearance; but on a budget.

My priority was to try something that would challenge myself within DIY Fashion and look completely different to the original. As you can see in the above images I applied lace all over the shoes and added a black trim around the shoes. The trim makes them look very high quality, it's always the smallest details that matter.
 
To do this you will need
 
Shoes - eBay - £6
Lace - Craft Store - 0.5 Metres £2.25
Black Trim - I used black elastic as it had a very silky shine - Craft Store - 3 Metres £2.10
Soft material to line the inside on the shoes - Already Owned - You can use any type of material just make sure it's soft
Cuticle stick and some tweezers - Already Owned - You can purchase these from most drugstores if you don't own them.
All Purpose Glue or Fabric Glue - Crafts Store - £2.00
Black sharpie or permanent Marker - Already Owned - You can purchase these from most Craft or Homewear Stores if you don't own them.

TOTAL = £12.25
 
Please checkout this DIY video tutorial and a number of different DIY Projects on my YouTube Page.


If you like this DIY please let me know what you think to these shoes and whether you would buy these in a store or any thoughts you have on this DIY.

See you soon!
XO

Sunday, 1 February 2015

Highlights At Home


Do you ever get tired of paying the price to have a bit of dye put into your hair. I think highlights have got to be one of the most annoying factors of having slightly darker hair than you would like. My hair has darkened over the years, mainly because I dyed my hair from a very light blonde to the darkest brown there is. Although I have not dyed my hair for quite some time and recently I have had an urge to do something with it. I get very bored very easily, I like to change up my look. The thought of dying it brown had crossed my mind or to try an ashey pink but for my profession its probably not wise. I made the decision to lighten my hair but instead of going to a salon which yes sounds like a more easier option, I wanted to test if I could dye my hair at home myself. I have dyed my hair so many times with a box dye, however they are a block colour and I wanted a bit more texture in my hair. I have a golden caramel colour going on at the moment and wanted to lighten my hair but keep them caramel tones. 


There are two ways to do highlights at home, use foils or a hair cap. I think a hair cap would be the easiest option as you just put the cap on and pull pieces of hair through the holes in the cap; and then you just apply the dye on to the cap. Sounds pretty easy right. Although I had one problem, I didn't have a cap and couldn't find one anywhere. I think they only sell them in professional beauty stores like Sally's. However I did have foil, who doesn't in their kitchen. This is something I have never tried before, but how hard could it be. I am the type of person to try different things and with a box dye it seemed very self explanatory. So I had everything I needed to highlight my hair, majority of the tools are easily found somewhere in your house. The only thing you need is your dye, I chose a box dye kit as they are super easy to use and everything is done for you. All you have to do is mix the solution and your good to go.

You will need

A Box Hair Dye 
Foil
Scissors
A Comb
A Hair Clip
A Towel 
Face Wipes
Shampoo/Conditioner

Please checkout the video tutorial now live on my Youtube Channel for an in-depth look into how I brightened up my hair for under £10, better than your average salon price of £30-£100. If you like this tutorial and my other videos please rate and subscribe and leave any comments below.


If you follow this tutorial and use this method for your own hair then please tweet me @katyharmston or Instagram me with the katyeharmston.


See You Soon!
XO

Friday, 23 January 2015

DIY CHOKERS


I have always had an obsession with Chokers but it was either I couldn't find one I really liked or it was stupidly over-priced for a piece of string. I spent a few weeks searching for one but no matter  how much I looked I still was not happy.

I am constantly in the Crafts Store browsing for DIY inspiration when I came across the amount of beautiful cord materials they stocked. I had a choice of Cord, Ribbons and Embellishments so I bought a range of materials to play with. The Assistant measured half a meter of each material so I had enough room incase I made a mistake. They were very inexpensive to buy ranging from 50p - £3.00 depending on the detail of the material.

To fasten my Chokers I chose to use Press Studs which I also bought for an inexpensive price of £1.99, however you can use hook and eyes, jewellery fasteners or velcro.
All of my items were bought from HobbyCraft but you can purchase these from any craft store.

You will need:

Material/Cord/Ribbon
Press Studs/Hooks&Eyes/Velcro
Embellishments (charms, beads or buttons)
Sewing Needle
Cotton Thread

Click below to watch the video tutorial to see how I make my own Chokers and if you make your own make sure you tweet my @katyharmston.


Please Rate and Subscribe to my channel if you like this DIY to see more videos and leave any comments below, I would love to here your thoughts on this DIY Project.


See You Soon
XO

Thursday, 15 January 2015

Acrylic Nails on a Budget

I am a big fan of acrylic nails and yes I am aware that they are not best solution for the health of your nails, but if you look at it that way. What heels are good for your feet? What Products and appliances are good for your hair? Stuff that all of us use on a daily basis are probably not the best solution, but we still use them. As women we are constantly looking for ways to feel more attractive and on trend with todays standards, whether its makeup, hair, fashion.


I am one of those people, I don't think about the downside. If I like something then I am going to get it one way or another. The one thing I didn't like when it came to acrylic nails, was the price. 

You walk into a nail salon on a monthly basis, which costs on average £25.00 for a full set and £15.00 for infills. If your nails grow fast you may need this quite often, which brings you to a monthly total of £40 at the minimum. This usually doesn't include a design, majority of salons will charge extra for that. I got to a point where I was spending stupid amounts of money on my nails and it was really starting to frustrate me.

After a week of my acrylic nails been taken off my short nails looked really sad! I decided to buy an acrylic nail set for myself to try and save money, and also to teach myself to do my own nails. The acrylic set I bought was a Nailene set from Savers which costs £7.99, but you can purchase them in Boots, although they are double the Savers price. I also bought a set of white tip nails which were £1.99 and the Elegant Touch Nail Polish Remover which removes artificial nails as well, this was £1.00. You don't neccessarily need the Nail Polish Remover, I only bought it to be on the safe side incase something went wrong. That brings our total to £9.99 without the Nail Polish Remover. This is a huge saving of… £30.01. and the set should last at least  a few months. Thats £3.33 for each month and even if yours only last two months, that is still an incredible saving.


So please please please get yourself down to Savers, Boots or go Online and try this out. Its may end up saving you quite a lot of money on a monthly basis, and if you don't like it then you've hardly lost anything! I finished my nails off with the O.P.I Shatter Nail Varnish which I picked up from Poundland.

Make sure you watch the tutorial on Youtube 'Acrylic Nails on a Budget' below.


If you like this post, then please hit that follow button or leave any comments. You can also Subscribe and give me a thumbs up for this tutorial on my channel.
I hope your having a lovely day!

See you soon!
XO