Showing posts with label DIY. Show all posts

Sunday, 2 August 2015

DIY Pink Ombre Hair at Home | Under £10.00

I am head over heels in love with the rainbow and pastel hair colours at the moment. After not dying my hair for 2 years to let it recuperate I decided I was going to go for a bright bold purple. I was returning home to Sheffield and I always tend to get my hair done when I'm up north as its significantly cheaper. When I had my hair coloured at the salon it was a very deep dark grey purple and I did like it but it was nothing like I wanted. A part of me felt like I had just wasted £70 on getting something done which I didn't go in for, its like when you buy an expensive product and its rubbish. It did start to wash out after a few weeks and eventually I was left with this Grey/Blonde Ombre with hint of lilac. I really started to hate it as it looked like a really dirty colour, I asked a friend who is a hairdresser if she could get it purple for me but she was booked up for 8 weeks; I definitely wasn't waiting that long!


I made the decision to take the plunge and experiment with a box dye. The dye I chose is a very vivid and beautiful colour, it is the Schwarzkopf Live Color XXL HD Ultra Brights in 94 Purple Punk. At first I was very nervous as I have been told Schwarzkopf colours are quite hard to get out of your hair. At this point my hair was quite light so I thought it would lay on my hair easily. Myself and my friend Helen who volunteer to help me, mixed the colour with quite a lot of condition to dilute the colour so it didn't come out super bright. Helen applied the dye to my hair and then I washed and then blow it, we were both very disappointed with the colour. The purple did not taken at all, we put it down to too much condition and my hair needed to be lighter.


At that point we made a plan to dip dye it blonde and then apply the purple with a small amount of conditioner. So a few days later we did just that, the blonde ombre was the L'Oreal Paris Feria Extreme Ombre in the Shade E02 Extreme Platinum Blonde. This is your normal box dye that you have to mix yourself and this set comes with what they call the Expert Brush. I am 100% in love with this thing, its the perfect brush for ombre hair dyes; it just combs the product through the hair creating a perfect gradient. 


The purple was next but unfortunately my camera battery died, I really do need to purchase a spare one. This means I was unable to film Helen putting the purple into my hair but it is the same process of how Helen applied the blonde in my hair. When Helen had finished the colour had been on my hair for 20 minutes or so, but I wanted to give it another 20 minutes to really soak in.

I was so happy when I dried and styled my hair, the gradient was flawless and a lot people I know made it clear that it looked better than what a professional salon did. That was quite a nice thing to hear as it was completely an experiment. I didn't really know how it was going to come out or if I would like it at all.

The Purple Punk is now £3.50 and the Extreme Ombre is £6.49, both from Boots. That is a total price of £9.99 for a statement hair colour.

The Purple Punk is 100% a type of Pink, I would never call it purple but it does have some tones of purple in. I think it all depends on the shades of your blonde before you put the colour on.

Please watch the step by step tutorial on my channel for my new Pink Ombre Hair.


If you like this hair colour and DIY please Rate, and Subscribe to my Channel for more videos.

Katy xoxo

Wednesday, 4 March 2015

DIY Two Piece Matching Set


The hype over matching two pieces inspired me to try and make one myself. This matching set was made from a dress I bought from Primark for £2. The dress was a size 14, two dress sizes bigger than my size. The print on the fabric is so vibrant and it would be great for the summer. It is a unique piece and you wouldn't have to worry about someone else wearing the same outfit.
 
 
I bought this dress specifically to do this DIY as it was only £2 so if anything went wrong I wouldn't loose anything. I tend to do this a lot. This was quite an easy task and anyone could do this as there is no sewing machine involved. If you have a sewing machine then great, but if not that isn't a problem.
 
I wanted to completely change the dress but some steps are not necessary. If you want something sweet and simple then this DIY is perfect for you. The great thing about matching two pieces is that they are multi purpose pieces, you can style the skirt and top together or with different outfits.
 
Please watch the video tutorial below for a step by step guide to how I made this two piece.
 
 
The materials you will need:
 
Dress
Pins
Scissors
Needle Picker (Optional)
Clothing Hem
Iron
Black Material
Card
Foam Material
White and Black Thread
Needle
Three Press Studs (Optional)
Hook and Eye (Optional)
 
To make this DIY easier I would definitely consider not cutting out the back of the crop top and only using material for your belt as it will be easily washable.
 
I hope you like this DIY and make sure you rate and subscribe to my channel for more videos!
 
Katy
xxx


Wednesday, 18 February 2015

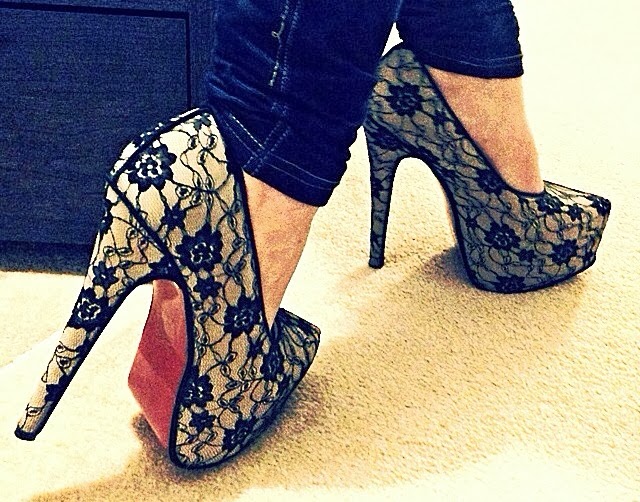
DIY Lace Heels


If your anything like me then you love shoes, my wardrobe is in the process of being transformed in order to fit more in! I can honestly admit I have a bit of an obsession! I can't really remember the first time I tried a pair of high heels but I bet it was funny. Strutting around in your mums heels! My other obsession is definitely being a crafty person, I like to transform anything I can into something that's my own, whether I'm creating something from scratch, transforming an item or adding a crafty touch.
 
My first YouTube video is a DIY video of transforming these nice classic heels. I bought these from eBay for a cheap £6. I have only worn them once as there slightly too big for me! They have just been sat in my closet for months so I took it upon my self to come up with ideas that would make them look unique but in season. I didn't want to replicate something I had seen, I just wanted to create something that would transform them and increase there value and appearance; but on a budget.

My priority was to try something that would challenge myself within DIY Fashion and look completely different to the original. As you can see in the above images I applied lace all over the shoes and added a black trim around the shoes. The trim makes them look very high quality, it's always the smallest details that matter.
 
To do this you will need
 
Shoes - eBay - £6
Lace - Craft Store - 0.5 Metres £2.25
Black Trim - I used black elastic as it had a very silky shine - Craft Store - 3 Metres £2.10
Soft material to line the inside on the shoes - Already Owned - You can use any type of material just make sure it's soft
Cuticle stick and some tweezers - Already Owned - You can purchase these from most drugstores if you don't own them.
All Purpose Glue or Fabric Glue - Crafts Store - £2.00
Black sharpie or permanent Marker - Already Owned - You can purchase these from most Craft or Homewear Stores if you don't own them.

TOTAL = £12.25
 
Please checkout this DIY video tutorial and a number of different DIY Projects on my YouTube Page.


If you like this DIY please let me know what you think to these shoes and whether you would buy these in a store or any thoughts you have on this DIY.

See you soon!
XO

Friday, 23 January 2015

DIY CHOKERS


I have always had an obsession with Chokers but it was either I couldn't find one I really liked or it was stupidly over-priced for a piece of string. I spent a few weeks searching for one but no matter  how much I looked I still was not happy.

I am constantly in the Crafts Store browsing for DIY inspiration when I came across the amount of beautiful cord materials they stocked. I had a choice of Cord, Ribbons and Embellishments so I bought a range of materials to play with. The Assistant measured half a meter of each material so I had enough room incase I made a mistake. They were very inexpensive to buy ranging from 50p - £3.00 depending on the detail of the material.

To fasten my Chokers I chose to use Press Studs which I also bought for an inexpensive price of £1.99, however you can use hook and eyes, jewellery fasteners or velcro.
All of my items were bought from HobbyCraft but you can purchase these from any craft store.

You will need:

Material/Cord/Ribbon
Press Studs/Hooks&Eyes/Velcro
Embellishments (charms, beads or buttons)
Sewing Needle
Cotton Thread

Click below to watch the video tutorial to see how I make my own Chokers and if you make your own make sure you tweet my @katyharmston.


Please Rate and Subscribe to my channel if you like this DIY to see more videos and leave any comments below, I would love to here your thoughts on this DIY Project.


See You Soon
XO